
This year has already seen some great new LEGO sets, but if you're a Marvel fan looking to build something new for your collection, the LEGO Iron Spider-Man Bust coming out on August 1 is well worth considering (preorders are live at Amazon and LEGO Store). And with Spidey's next cinematic adventure on people's minds right now, it's a good time to work on a LEGO set like this one.
Coming in at the relatively low piece count of 379, the set was quick and fun to put together. While it's recommended for ages 18 and up, landing it in the LEGO sets for adults category, it's not overly complicated and only took me a couple of hours to (Avengers) assemble it. Most kids who are Spidey-fans should get by just fine with this set.
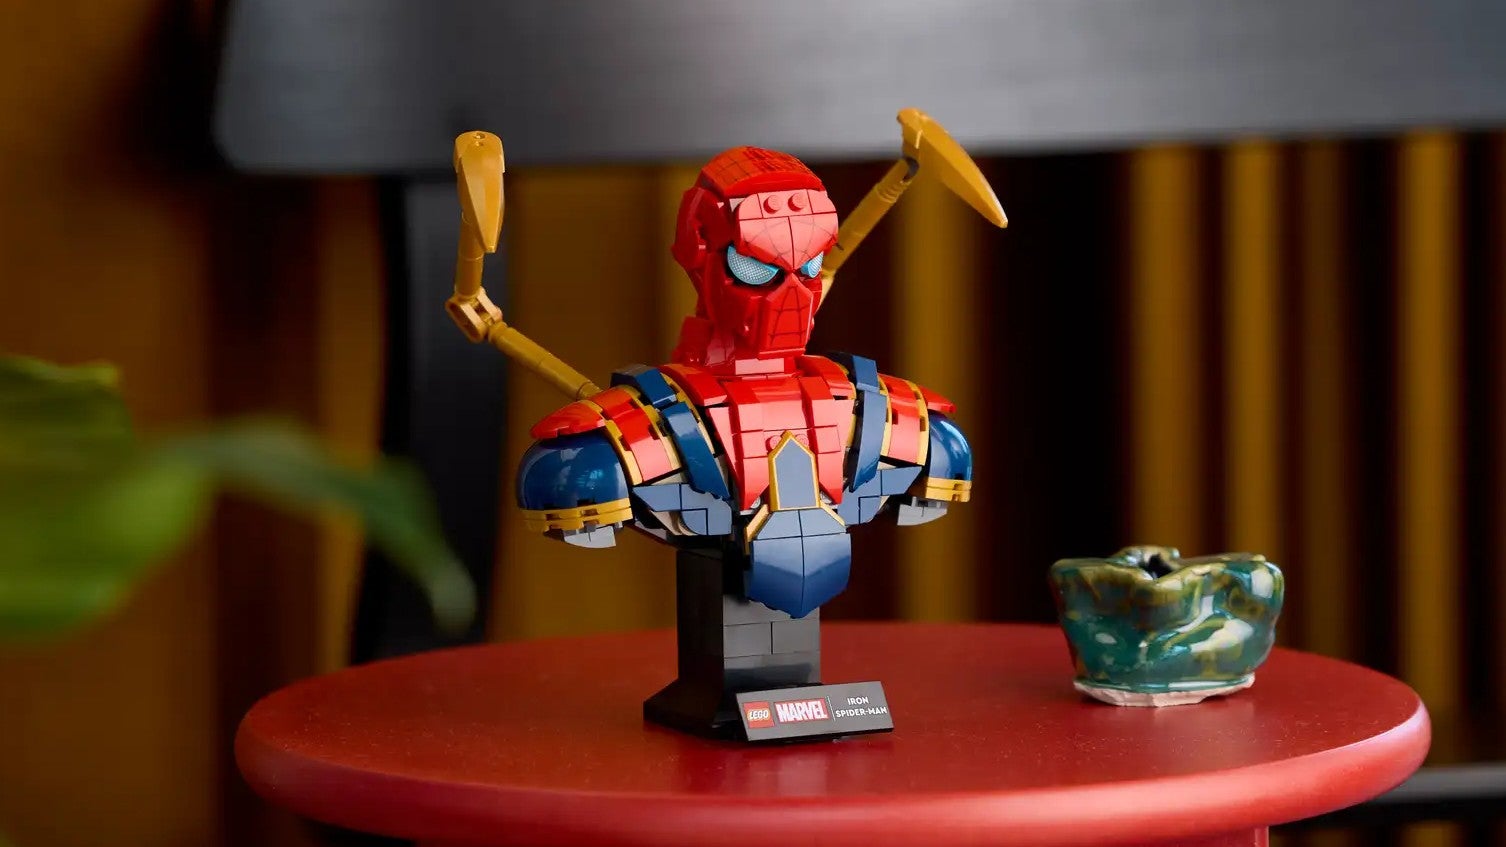
The bust features Spidey's head and shoulders, with the top half of the Iron Spider suit visible. The head and legs of the suit are movable, allowing you to pose them for display, which is a cool touch. The set overall has a nice amount of detail, and even comes with a plaque to set up on the bottom alongside a minifigure of the hero himself decked out in the full Iron Spider suit.
This build also features two interchangeable bases. One centers the plaque while the other leaves space for both the plaque and minifigure on both sides of the bust. I chose to build the latter, so my mini Spider-Man could be shown off alongside the larger bust. I didn't want him to feel left out (he's still feeling pretty lonely after the loss of Mr. Stark.)
The opening pages of the instruction booklet offer a little extra detail about this Spider-Man suit and when it was first shown off in Spider-Man: Homecoming. From the mind of Tony Stark, the Iron Spider suit has been a highlight of Spidey's adventures in the MCU.

The set comes with the instruction booklet and four bags that contain pieces for the bust itself and its base. Bag one kicks things off by having you constuct the Spider-Man minifigure. He comes with a mini Iron Spider suit with little legs attached. I'm a big fan of him.

With mini Spidey built, the next steps focus on building the bust's core, which is eventually placed on top of the base pedestal. There are 22 steps in this process, which help to make a solid support system to eventually build out the rest of the bust from. It's from this center piece that you'll add more of the suit, build out Spider-Man's shoulders, and attach his head.

After this, you have to choose which of the two base options you want to build. One base allows you to set up the plaque front and center, while the other option uses two A-shaped plates to branch out the base to hold both the plaque and minifigure. Again, I chose the latter, but it's easy to swap to the other base if you'd prefer to just have the plaque. The instruction booklet guides you to different pages to build the base of your choosing. Once completed, the core of the Spider-Man bust gets placed on top of it.

This is when we get to dig into bag number two and start building out the bust. Naturally, the first focus is the front and back of the suit, which feature a vibrant collection of red and blue pieces, plus the gold accent lines, capturing that mixture of Spider-Man's classic suit colors with Iron Man's sleek metallic touches. From here, you build out the sides of the suit – again in colorful patterns of red, blue, and gold - capped off with big blue shoulders at the end.

Bag three focuses on building the neck and head/mask part of Spidey's suit, complete with some sweet lenses. Once the head is constructed, you'll then attach a longer LEGO piece with a ball joint at the end to the 'neck' area, which can then be slotted into the main part of the suit.
With this addition, you're able to swivel his head around to various positions, depending on how you want to show him off once you're done. It's one of my favorite parts about this build. I like that you can pose the head to give it a little extra personality once it's on display.

The fourth and final bag features the pieces for the legs of the Iron Spider suit. Much like Spider-Man's head, these are also poseable, so you can place them in various positions once you're all done. Before putting together the legs themselves, you first assemble a harness for them to hook into that can be fitted into the back of the suit.
Once added on, the legs can be assembled and attached to the sides of that harness, where they come up and over Spidey's shoulders. If you want to move them around, you can do so from the back joint, middle joint, and the tips at the very top.

And with those final pieces slotted in, the Iron Spider-Man Bust is complete. You can see the full set below.

With just 379 pieces, this set is on the smaller side – as detailed on LEGO's store page, it measures 6.5 inches (17 cm) high, 7.5 inches (20 cm) wide and 4.5 inches (11 cm) deep – which makes it a great fit for a smaller space like on a bookshelf. Again, it only took a couple of hours to complete, so if you're a fan looking for a quick LEGO Marvel set build with a fun design to add to your collectible shelf, the Iron Spider-Man Bust is worth it.
Hannah Hoolihan is a freelancer who writes with the guides and commerce teams here at IGN.